
One of the many things you need to consider when submitting your app to the Windows Store is the ability to handle rotation and snap view. Now, as far as I know it’s not mandatory because in the first release of DeTV I lacked both but it was approved anyway. Also some apps are not even meant for running in snap view. Nonetheless if you can you should always try to support both snap view and rotation. In this demo I’ll guide you through the basics you need to know for implementing both orientation and snap in your app. But first a little background on layouts and resolutions: according to the Windows Store certification requirements your app must support a minimum resolution of 1024 x 768. Also your app must remain functional when it is snapped and unsnapped. From this you can conclude that at a minimum your app has to support the following three visual states:
- 1024 x 768 (the minimum resolution and while in filled state),
- 320 x 768 (snap view) and
- the default resolution you plan for your app (generally 1366 x 768).
Of course it’s not appropriate to just shrink or stretch the UI of your app in order to support the snapped and filled views. Luckily there’s a few tricks you can use out of the box for rearranging the display when snapping and unsnapping your app – kind of like responsive web sites change looks when viewed on a smartphone or pad. By default all Windows Store App templates support rotation but for some apps that might not be the preferred state. For instance for a game it maybe only makes sense to run in landscape mode. If you open the Package.appxmanifest file and check the Application UItab you can choose which rotations your app should support.

Getting started
Start by creating a new Blank Windows Store App. Unless your computer supports rotation run your blank app in the simulator. If you rotate it you’ll see that the app supports all rotations by default. You can play with the supported rotations in the Package.appxmanifest and view the results in the simulator as well. Now open the MainPage.xaml file and add a TextBlock. We’ll use it later for feedback on the rotation and snapped state.
[sourcecode language=”xml”]
<Page
x:Class=”RotationAndSnapDemo.SimpleOrientationSensorPage”
xmlns=”http://schemas.microsoft.com/winfx/2006/xaml/presentation”
xmlns:x=”http://schemas.microsoft.com/winfx/2006/xaml”
xmlns:local=”using:RotationDemo”
xmlns:d=”http://schemas.microsoft.com/expression/blend/2008″
xmlns:mc=”http://schemas.openxmlformats.org/markup-compatibility/2006″
mc:Ignorable=”d”>
<Grid Background=”{StaticResource ApplicationPageBackgroundThemeBrush}”>
<TextBlock
x:Name=”MyRotation”
HorizontalAlignment=”Left”
TextWrapping=”Wrap”
Text=”No Rotation Info”
VerticalAlignment=”Top”
Margin=”10,10,0,0″
FontSize=”24″/>
</Grid>
</Page>
[/sourcecode]
That’s it for the MainPage.xaml for the moment. Now open up the MainPage.xaml.cs file and start by adding a using statement: using Windows.Devices.Sensors;. Next we need an instance of the SimpleOrientationSensor.
[sourcecode language=”csharp” highlight=”1,8,12,26″]
using Windows.Devices.Sensors;
using Windows.UI.Popups;
using Windows.UI.Xaml.Controls;
using Windows.UI.Xaml.Navigation;
namespace RotationDemo
{
public sealed partial class MainPage : Page
{
private SimpleOrientationSensor orientationSensor;
public MainPage()
{
orientationSensor = SimpleOrientationSensor.GetDefault();
this.InitializeComponent();
}
protected override void OnNavigatedTo(NavigationEventArgs e)
{
if (orientationSensor == null)
{
var messageDialog = new MessageDialog(“No orientation sensor was found.”);
messageDialog.ShowAsync();
return;
MyRotation.Text = orientationSensor.GetCurrentOrientation().ToString();
}
}
}
}
[/sourcecode]
This is the code so far. Instantiate the SimpleOrientationSensor in the constructor and do a quick check in the OnNavigatedTo event if we have one available or not. Note: the messageDialog.ShowAsync(); will give you a warning because it’s not awaited but you can ignore that.

This is because the simulator actually simulates the computer you’re working on. So, if it’s like mine, a 10+ kg workstation, odds are that you’ll be greeted with the above message. This also means we’ll need to come up with some other solution in order to test the rotation. Luckily there’s a simple solution to the problem. That is if you have a second device with rotation sensors available. In short you’ll need to install the Remote Tools for Visual Studio 2012 on the device. You can get it from the Visual Studio download page and I have a tutorial on remote debugging that explains how to install and set it up. Now if you run your app on the remote machine your textblock will tell you the current rotation of your device but it won’t reflect any rotation changes. For that we’ll have to add an event handler to our code to catch the changes.
[sourcecode language=”csharp” highlight=”2,11,15,19,32,45″]
using System;
using Windows.Devices.Sensors;
using Windows.UI.Popups;
using Windows.UI.Xaml.Controls;
using Windows.UI.Xaml.Navigation;
namespace RotationDemo
{
public sealed partial class MainPage : Page
{
private SimpleOrientationSensor orientationSensor;
public MainPage()
{
orientationSensor = SimpleOrientationSensor.GetDefault();
this.InitializeComponent();
}
protected override void OnNavigatedTo(NavigationEventArgs e)
{
if (orientationSensor == null)
{
var messageDialog = new MessageDialog(“No orientation sensor was found.”);
messageDialog.ShowAsync();
return;
}
orientationSensor.OrientationChanged += OrientationChanged;
ShowOrientation(orientationSensor.GetCurrentOrientation());
}
protected override void OnNavigatedFrom(NavigationEventArgs e)
{
orientationSensor.OrientationChanged -= OrientationChanged;
base.OnNavigatedFrom(e);
}
async void OrientationChanged(SimpleOrientationSensor sender,
SimpleOrientationSensorOrientationChangedEventArgs args)
{
await Dispatcher.RunAsync(Windows.UI.Core.CoreDispatcherPriority.Normal,
() => { ShowOrientation(args.Orientation); });
}
void ShowOrientation(SimpleOrientation simpleOrientation)
{
string orientation;
switch (simpleOrientation)
{
case SimpleOrientation.Facedown:
orientation = “facing down”;
break;
case SimpleOrientation.Faceup:
orientation = “facing up”;
break;
case SimpleOrientation.NotRotated:
orientation = “landscape”;
break;
case SimpleOrientation.Rotated180DegreesCounterclockwise:
orientation = “landscape-flipped”;
break;
case SimpleOrientation.Rotated270DegreesCounterclockwise:
orientation = “portrait”;
break;
case SimpleOrientation.Rotated90DegreesCounterclockwise:
orientation = “portrait-flipped”;
break;
default:
orientation = “unknown”;
break;
}
MyRotation.Text = “Current orientation: ” + orientation;
}
}
}
[/sourcecode]
The code above is what we need for our project for the moment. Press F5 to start it on your remote machine to see how it behaves. You can see that in addition to the landscape and portrait orientations there’s also facing up and facing down. These will trigger if you lay the device down or flip it upside-down. This way you can take actions in your code to rearrange the content for different orientations. You can also choose which orientations you want to act on. If you disable any of the orientations in the Package.appxmanifest file you’ll discover that the event is still fired for your disabled orientations even if the screen doesn’t flip that way.
About the code; first add using statements for the Windows.Devices.Sensors and Windows.UI.Popups namespaces. The Popups namespace is of course only for the message box and is not really needed for detecting orientation. Then add a SimpleOrientationSensor and instantiate it in the constructor method. If no rotation sensor is present this will return null.
In the OnNavigatedTo event handler check that a sensor is present and if not pop up a message and return. Otherwise add an event handler that will subscribe to the OrientationChanged event of the SimpleOrientationSensor. Lastly call the method for displaying the current rotation.
When leaving the page unsubscribe from the OrientationChanged event in the OnNavigatedFrom event handler. It’s no longer necessary.
OrientationChanged is the event handler that is assigned to subscribe to orientation changes. Note the async keyword in the method declaration. It’s used for making the method awaitable. Inside the event handler make a call to the ShowOrientation method for displaying the current rotation. Since the ShowOrientation method doesn’t have any awaitable code use the Dispatcher.RunAsync method for making the call asynchronously.
In the ShowOrientation method add a switch block for determining the current rotation and type in the messages that will be displayed for each rotation. Using this method the appearance of the app could now be revamped to fit the current orientation. But there’s an easier way.
The VisualStateManager
While acting on orientation changes in code is a possible way to re order the appearance of an app it might not be the most straightforward path. This is where VisualStateManager comes in.
In the project add a new Basic Page and call it RotationPage.xaml. As you can see in the description for the Basic Page it supports layout awareness. This is the magic key to using visual states in your app. The Basic Page is a LayoutAwarePage and provides in itself the structure to orient itself and snap properly. In addition to the VisualStateManager the Basic Page also adds a back button, title and a grid to your new page.
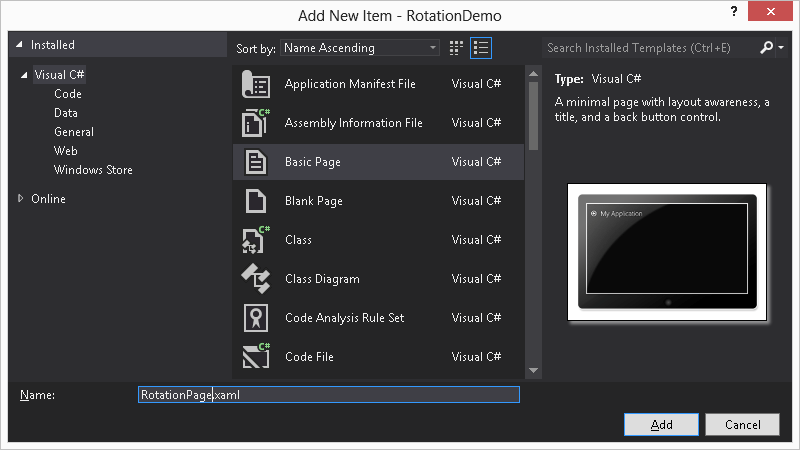
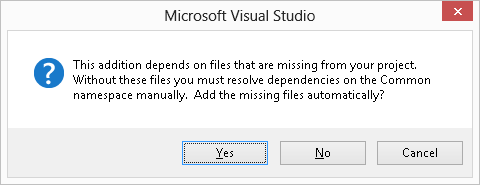
When you click on add you will most likely be greeted with a message telling you that the Basic Page is dependent on files missing from you project. Click Yes to add these files automatically.
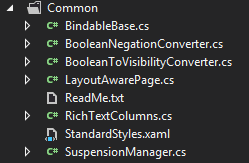
The new files are added to the Common folder in your project.
Rebuild your project once for resolving the missing dependencies. Now you should be able to see your new page in the Design View in Visual Studio. Now take a look at the XAML. Look for the VisualStateManager.VisualStateGroups block. You’ll see a VisualStateGroup which in turn contains the visual states:
- FullScreenLandscape
- Filled
- FullScreenPortrait
- Snapped
Using the Storyboard you can apply different appearance for the different visual states. First you need to set a name for the root grid of the page so that you can access it later from the XAML. Also add a textbox on the page (I called it MyViewState).
[sourcecode language=”xml” wraplines=”false”]
<Grid Name=”rootGrid” Style=”{StaticResource LayoutRootStyle}”>
…
<TextBlock x:Name=”MyViewState” HorizontalAlignment=”Left” Margin=”10,10,0,0″ Grid.Row=”1″ TextWrapping=”Wrap” VerticalAlignment=”Top” FontSize=”24″ Text=”No state yet”/>
[/sourcecode]
Now find the block of visual states in the XAML. By adding Storyboard and animation tags to the visual states (the snapped and portrait states already have them) for manipulating the values of objects on your page.
[sourcecode language=”xml” highlight=”5,8″ wraplines=”false”]
<VisualStateGroup x:Name=”ApplicationViewStates”>
<VisualState x:Name=”FullScreenLandscape”>
<Storyboard>
<ObjectAnimationUsingKeyFrames Storyboard.TargetName=”MyViewState” Storyboard.TargetProperty=”Text”>
<DiscreteObjectKeyFrame KeyTime=”0″ Value=”FullScreenLandscape”/>
</ObjectAnimationUsingKeyFrames>
<ObjectAnimationUsingKeyFrames Storyboard.TargetName=”rootGrid” Storyboard.TargetProperty=”Background”>
<DiscreteObjectKeyFrame KeyTime=”0″ Value=”#FFFF0000″></DiscreteObjectKeyFrame>
</ObjectAnimationUsingKeyFrames>
</Storyboard>
</VisualState>
…
[/sourcecode]
You can add animations to all four visual states and set different background colors if you like. If you run your app in the Simulator you will see that it actually supports the visual states even though it doesn’t support the SimpleRotationSensor object. Simple page layouts like the Basic Page really don’t need much rearranging of the content but the more complex your content gets the more you’ll have to pay attention to arranging it nicely for different visual states.
Summary
This should have given you an introduction on how to manage different visual states in your Windows Store App. For more complex layouts you will most likely have to rearrange grids or even create different layouts for the different states. The most important point you need to remember from this tutorial is that your app must support the snapped state.


