After too much consideration about the looks and other fluff of On Error Resume Next I’m gonna kick off with a post instead.
One of the things that bugged me while writing DeTV was the lack of tools in the toolbox for creating the charm flyouts for the about and privacy policy pages. So after a quick search I stumbled upon the CharmFlyoutLibrary by John Michael Hauck which did the trick. Still a bit tricky to get working with a gridapps due to the fact that they lack a MainPage.xaml. John Michael of course has an in-depth post about this but I though I’d give it a go with a simple tutorial on how to get CharmFlyoutLibrary up and running with a gridapp.

You can get hold of CharmFlyoutLibrary from the Windows Dev Center but I prefer using NuGet. I’ll be building an app from scratch in C# but you can of course follow the steps in your own app. We’ll start by creating a new Windows Store Grid App.
From the Solution Explorer in your new project right click the References folder and pick “Manage NuGet Packages…”
Type CharmFlyout in the search box and hit Install for adding the CharmFlyoutLibrary to your project.
You should see the CharmFlyoutLibrary under References in the Solution Explorer. Now create a User Control to host your flyouts and call it Flyouts.xaml.
[sourcecode language=”xml”]
<UserControl
x:Class=”CharmFlyoutGrid.Flyouts”
xmlns=”http://schemas.microsoft.com/winfx/2006/xaml/presentation”
xmlns:x=”http://schemas.microsoft.com/winfx/2006/xaml”
xmlns:d=”http://schemas.microsoft.com/expression/blend/2008″
xmlns:mc=”http://schemas.openxmlformats.org/markup-compatibility/2006″
xmlns:cfl=”using:CharmFlyoutLibrary”
mc:Ignorable=”d”>
<Grid>
<cfl:CharmFlyout
x:Name=”cflAbout”
Heading=”About Flyout”
HeadingBackgroundBrush=”Purple”
ContentBackgroundBrush=”{StaticResource ApplicationPageBackgroundThemeBrush}”>
<StackPanel>
<TextBlock FontSize=”14″ TextWrapping=”Wrap” Padding=”0,0,0,7″>
Use Charm Flyouts for About, Privacy Policy and Settings etc.
</TextBlock>
<HyperlinkButton Click=”GotoTutorial” FontSize=”14″>
View Tutorial
</HyperlinkButton>
</StackPanel>
</cfl:CharmFlyout>
<cfl:CharmFlyout
x:Name=”cflSettings”
Heading=”Settings”
HeadingBackgroundBrush=”Purple”
ContentBackgroundBrush=”{StaticResource ApplicationPageBackgroundThemeBrush}”>
<StackPanel>
<CheckBox Content=”Setting 1″ FontSize=”14″ />
<CheckBox Content=”Setting 2″ FontSize=”14″ />
<CheckBox Content=”Setting 3″ FontSize=”14″ />
</StackPanel>
</cfl:CharmFlyout>
</Grid>
</UserControl>
[/sourcecode]
You can get rid of the DesignHeight and DesignWidth attributes from the UserControl tag since the dimensions will be controlled by the flyout. Add the CharmFlyoutLibrary namespace to your control by adding the attribute xmlns:cfl="using:CharmFlyoutLibrary" to the UserControl tag. I chose to call it cfl but you can call it whatever you like as long as it doesn’t interfere with any other namespace in your control.
For each flyout you need you create a <cfl:CharmFlyout>...</cfl:CharmFlyout> tag. You need to supply the x:Name and Heading attributes (well, technically the heading is not required but nice to have). The contents of the flyout will be everything wrapped within the StackPanel inside the CharmFlyout.
In the above example I have two flyouts: cflAbout and cflSettings.
Next you’ll need to add the code behind for handling the flyouts.
[sourcecode language=”csharp”]
using System;
using Windows.UI.ApplicationSettings;
using Windows.UI.Xaml;
using Windows.UI.Xaml.Controls;
namespace CharmFlyoutGrid
{
public sealed partial class Flyouts : UserControl
{
public Flyouts()
{
this.InitializeComponent();
// Add an eventlistener.
SettingsPane.GetForCurrentView().CommandsRequested += Flyouts_CommandsRequested;
}
void Flyouts_CommandsRequested(SettingsPane sender, SettingsPaneCommandsRequestedEventArgs args)
{
// Add commands for handling each flyout.
args.Request.ApplicationCommands.Add(new SettingsCommand(“a”, “About Flyouts”, (p) => { cflAbout.IsOpen = true; }));
args.Request.ApplicationCommands.Add(new SettingsCommand(“s”, “Settings”, (p) => { cflSettings.IsOpen = true; }));
}
// This method will fire whenever the hyperlink in the About flyout is clicked.
private async void GotoTutorial(object sender, RoutedEventArgs e)
{
var uri = new Uri(“http://hsballina.wordpress.com/2012/11/06/windows-8-charm-flyouts/”);
await Windows.System.Launcher.LaunchUriAsync(uri);
}
}
}
[/sourcecode]
There’s actually only two things you need to consider in the code behind:
- Add an event listener in the constructor and
- in the event handler method add a command for handling each flyout.
The GotoTutorial method is only for handling the click event for the HyperlinkButton in the about flyout.
The last thing you’ll need is to modify App.xaml.cs to use a frame that supports additional content and add your new flyout user control to it. CharmFlyoutLibrary has one included; the CharmFrame.
Find the line in the OnLaunched method where the rootframe is assigned to a Frame and modify it to a CharmFrame instead.
[sourcecode language=”csharp”]
protected override async void OnLaunched(LaunchActivatedEventArgs args)
{
Frame rootFrame = Window.Current.Content as Frame;
// Do not repeat app initialization when the Window already has content,
// just ensure that the window is active
if (rootFrame == null)
{
// Assign the rootframe to a CharmFrame and the CharmContent to your flyout UserControl.
rootFrame = new CharmFlyoutLibrary.CharmFrame { CharmContent = new Flyouts() };
[/sourcecode]
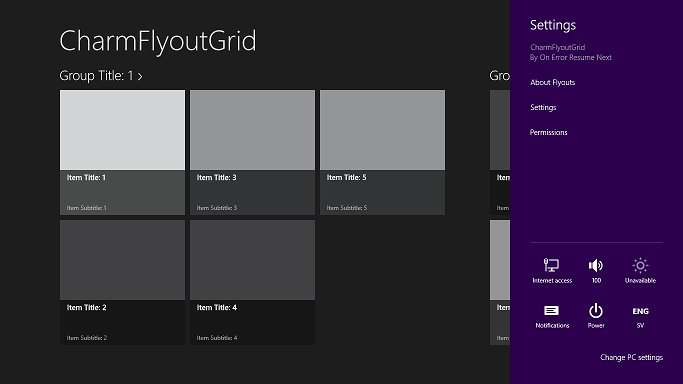
Hit Ctrl+F5 to run your app and watch your flyouts by pressing the Windows key+I.
CharmFlyoutLibrary is a great and simple tool for adding charm flyouts to your Windows Store app. Find out more about it on John Michael Hauck’s own blog.
Links
- w8isms, John Michael Hauck’s blog
- CharmFlyout